
The Character Design Process (From a Non-Professional)
Character design is an integral part of any kind of media involving storytelling. There are many factors that go into creating a character that visually shows their personality as well as attracts the correct target audience. While sometimes character design involves creating a visual representation of an existing character, this is a process used to create a character from scratch.
Brainstorming and Backstory
During the brainstorming process, answer questions such as: what is your purpose in creating the character? Who is the intended audience? Who is the character? What is their function/purpose/goal? During this time, look for visual references of the type of character you're creating, or create a visual mood board to collect different aspects of the character such as aesthetics, costuming, quotes or song lyrics that fit the character, etc.
To start thinking of a backstory, consider when the character first appeared or were born, what type of world they exist in (finding visuals to create a mood board for this is beneficial as well), and how their past shaped who they are today.
One thing that might be helpful is to look at what other characters are out there similar to the one you're creating, and consider how you're character will stand out from the group. Also consider what style of illustration the character will be drawn in; this heavily depends upon what format they are intended for (animation, comic book, graphic novel, etc.)
Shape and Proportion
Shape and proportion are very important principles in the character design world. In basic terms, using basic shapes (such as circles, squares, triangles) have an effect on how the characters are perceived by the audience. Proportion also impacts perception, and is often measured by the head height of the character. Young characters often stand two to three heads tall, while an adult character tends to be between six and eight heads tall.
To begin constructing a character, do at least 10 sketches playing around with different shapes and proportions to find your character. In the example below on the left, I used a character design shape and proportion grid to easily measure the character's proportions based on head height. One square of the grid represents one "head". The smaller character stands at 6 heads tall while the taller characters are 8 heads tall. The sketches on the right were for a squirrel character, and provides examples of how I used different shapes for its design.


Next, choose which combination of shapes and proportion best represents the character, and create a finalized drawing of the character including defining features such as hair, facial features, and clothing.
The Model Sheet
Once the shapes and proportion of the character are decided, it's time to create a model sheet. Model sheets are important to show what the character looks like from all sides, this way they can easily be drawn later on in varying poses and perspectives. A basic model sheet includes the basic shapes the character is made of, as well as a front, back, and side view. Some model sheets will also include a few different facial expression sketches or elements from the character's world.
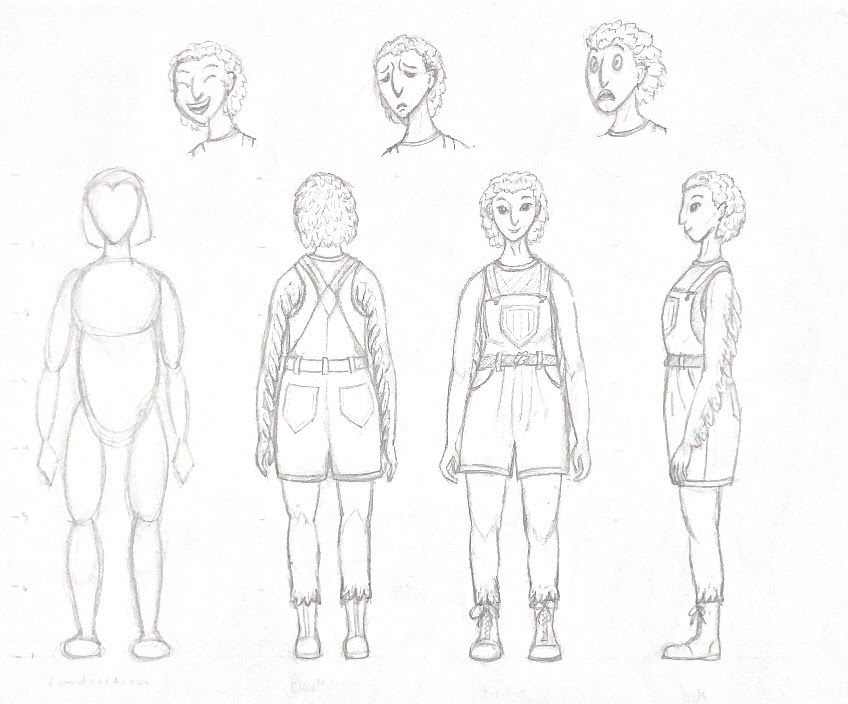

The Mind Map
One step that is beneficial to creating a character, is to create a "mind map". This is a visual that tells about the character's personality as well as who they are, and includes a fully colored rendering of the character engaged in some relevant action, and their color palette.

Oakley Mind Map 
Nori and Hestia Mind Map
Further development could include creating a pose sheet that shows the character engaged in different actions and poses, or creating different scenes in which the character is interacting with different elements in their surroundings. Once the character is created and their personality is established, they can be used for their intended purpose.


Comments